Category: Okategoriserade
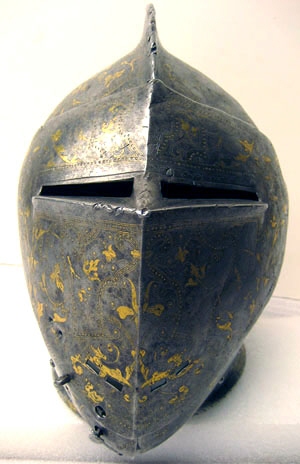
Cheek parts
The Cheek parts is made of 2 mm mild steel and streched out a bit on the anvil. All the forming is made from the inside.

To be able to create a circular bottom line I use a circular disk as a guide.


On the original you can se holes on the helmet matching holes on the cheekparts. I think the parts has been riveted together when the final shape has been done.


Titta på ”Making a armourers hammer” på YouTube
See how one of the hammers I use are forged: https://youtu.be/WAacc2RMeyE
The comb

Now the comb is raised and sharpened on the comb stake. I am very carefull with the hammer when I have a lot of heat in the top of the comb, but i do most of the shaping when the metal is hot to avoid stressing the material. Smaller adjustments and planishing I do cold.


Helmet, raising the comb

After streching the helmet from the inside I have now raised it from the outside. when i was pleased with the hight and the side silhouette from the side I started to mark out the position of the comb


Then i heat the helmet skull on the forge and start to push in material on each side of the comb on a rounded stake. This way prevents the material to strech out to much and get to thin.


I try to work as much ad possible “on air” to prevent the material to get thin. Here i´m still working on the small ball stake pushing the material together. It´s quite easy using this metod on thiker plate. Next step is to sharpen the comb, and that you can se in the youtube movie posted earlier.
Titta på ”Helmet comb” på YouTube
Titta på ”Helmet proceeding” på YouTube
Last week I made the skull of the helmet. I still need to forge the comb sharper, adjust the shape a little bit and planish it. But so far I am pleased with the result. https://youtu.be/qVfDV7_XnDY
Titta på ”Armour hammers” på YouTube
Some words about the armour making hammers I use.
Bashing out material
On next helmet I decided to go for thicker plate again, I was not pleased with the way the surface on the inside looked on the 3mm helmet mostly raised from the outside. The hammermarks did not looked the same as on king Eriks XIV:shelmet. So the first thing I did was to reshape the long stretching hammer so it got a more rounded head with smaller radius. Then I started with a piece of 4 mm mild steel measuring 40×35 cm. With cut corners on the side that will be the neck on the helmet.

Then I stretched the part that will be the forehead of the helmet. And worked around all sides.

This flat stretching I did on a modern flat anvil with a big stretching/raising hammer.

Now I have stretched out 6 cm on the length and 4 cm on the with. When I was pleased with the thickness of the flat stretching, approximately 2,5 mm. I started to heat and raise the helmet from the inside with the longer more rounded hammer.

Still on the flat anvil.

It is quite easy to control how much you want the material to move and I’m much more pleased with the look of the inside surface. I continued with this method until I had reached the length of 50 cm on the outside.

The result so far is much more promising than earlier.
Helmet, inside
You can clearly se the hammermarks of a round hammer, that have been used from the inside quite late in the shaping process of the helmet. if it had been forged more from the outside the hammermarks wold not have been so “sharp” as they still are.


It´s mabye hard to se, but the difference is quite clear when looking at it in real life.

