Finished

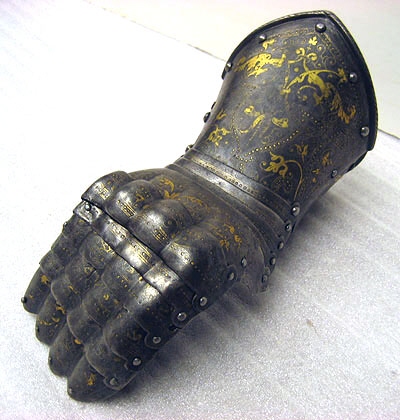
Finally the masterpiece armour is finished!!! All metalwork anyway, i just have to stitch the glove in the gauntlet and make padding for the helmet… Actually it was finished a month ago. so it just took two weeks more than expected to make it, a total of five month and two weeks. Now we are working on the exhibition, movie and the book.

The armour will be examined by a jury at the Royal Armouries in Stockholm the 30th November. and in the afternoon same day it will be on public viewing.The jury will give their opinion on the armour, the quality of the work and tell if it is approved as a work that can stand as a model of witch that a modern armourer wold master today. then I will talk about the making of it, its history and the re-installation of armourmaking as a official trade in Sweden. More information, and pictures!!, will come later.

It has so far been a great experience, and i have learnt a lot. much witch I will shear in the exhibition. the last month I had to focus more on the making of the armour than sharing on social media, I had to cut down on this to be able to finish the armour in time. one goal of the project was also to try to make it as quick as possible to come closer to the armourers in the 16th century this is one the reason why i tried to make it in 5 monht. but i have been doing a lot of documentation that will come together in the book later on.

The exhibition will be held at The Royal Armouries in Stockholm opening in October 2020 standing at least nine month. the book will be finished by then. hopefully the exhibition will after this go on tour to other museums around the world.

Thanks all supporters backers and sponsors of this project so far!!

Gorget

Forging the gorget.

The gorget is made of 2 mm mild steel. It’s thick, but the helmet and Brest plate is “bullet proof” so the gorget thickness will match this.

The neck lamellas are cut out strait and then forged in to a curved shape by stretching the material more on one side, this creates the curve and also thins it out, which is good, this lamellas will have quite much overlap so they don’t need to be as thick as the two bigger parts.

The upper edge on the last lamellae is rolled and turned outwards to create a lip which will be encountered by the lower edge on the helmet. This needs to be a perfect circle to allow the helmet to turn around smooth.

When the parts are ruffly forged, I rivet them together, and heat again on the forge, to make the final adjustments.

When riveted togethe, it looks a bit long, but the lamellae will be riveted onto leather when the gorget is finished, so the movability will be better, now it is in its most upper position.

I have now tried it with the helmet, and on the body, so now I can continue with the Brest and backplate.

Gauntlets

Now I have left the helmet for the time being and cut out material for the breast and backplate, arms and gauntlets. Last weekend I had some professional film makers in the workshop making some very nice shots of several techniques that I use when making the masterpiece armour.

I made all the rough forging on the left gauntlet, except for the thumb, in advance. And this week I started with the right one. Also for the gauntlet I use the gauntlet of Erik XIV as a model.

Lrk 23389

I have looked at, and taking measurements of this gauntlet. It is of quite simple construction, and made of fairly thick material. I use 1,5 mm mild steel but stretches it out a lot on the finger and hand lamellars.

The pattern is lined out on the sheet metal and cut out with a chisel and and shears.

Then I heat it in the forge and stretch it out on the anvil from the inside. With a rounded hammer. ( looks like the original) when stretching I can also adjust the shape of the pieces.

The “fingers” are now forged from the inside on a concave stake and on the anvil.

The stake ( this is not made to fit in the workbench) if you are skilled you can achieve the same result on the corner of the anvil, but for me that’s a little bit more time consuming.

When using this stake you will get a perfect curve on the finger lamellar.

The convex cure is then adjusted on a small ball stake. Here the “finger” closest to the camera is adjusted.

When all are forged, its time to adjust them to each other. And make holes for the rivets that joins them together.

When I have riveted the pieces together, I heat it again and adjust the parts a final time. This will make them work very well in movement.

After this step I will take all apart again and file up all holes so the movability will get even better.

Forging the finger piece.

Adjusting the lamellar.

Visor

The visor is made from 3mm mild steel. Forged from the inside, streching out the material, and then raised from the outside. the ridge below the eye slits are shaped on “air” so far.

Visor rougfly forged

I have to cut away some material. sometimes it´s hard to calculate the size on the piece you start with. In this case i had to strech the material out towards the pivoting rivets. And i have to cut away material at the top and the bottom of the visor. This I do wit a chisel.